
Get Started with ASP.Net AJAX Controls: Gauging the Data Configuration
Dependency Configuration
Let’s also bring in the appropriate data access libraries that we need for this project. I've chosen to use the Entity Framework library and Sql Server compact for data storage. These tools will allow us to rapidly configure a database, add data access methods without leaving our web project, and does not require us to write any additional sql code.To add these libraries, we need to reach out to NuGet and install the EntityFramework.SqlServerCompact package. By installing this package, a few dependencies will be installed for the Entity Framework and for SQL Server compact. Installing a package with NuGet is as simple as right-clicking on the name of the project in the Visual Studio Solution Explorer and selecting “Manage NuGet Packages”.
In the resultant window, select ‘Online’ on the left navigation panel. Finally, type “EntityFramework.SqlServerCompact” into the Search textbox to find the package. Finally, click “Install” next to the package name. You will then need to accept some licensing terms, and the packages will install promptly after that. Close the ‘Manage NuGet Packages’ dialog window and we can begin creating our data model.
Setting up the Data Model
In this project, we are going to configure a small data model that allows Guests to create Reservations for hotel Rooms. Additionally, we would like to display a series of RoomCharges on a detail screen. I have marked in bold those objects that sound like the starting entities for our data model. With these elementary rules defined, I defined our data model using the Entity Framework Code First approach in a folder called Models. The following classes were created in that folder:
01.public class Room {02. 03. public int RoomID { get; set; }04. 05. [Required]06. public string Address { get; set; }07. 08. [Required]09. public string BedType { get; set; }10. 11.}12. 13.public class RoomCharge {14. 15. public int RoomChargeId { get; set; }16. 17. public string Description { get; set; }18. 19. public decimal Value { get; set; }20. 21.}22. 23.public class Guest24.{25. public Guest()26. {27. this.Reservations = new List<Reservation>();28. }29. 30. public int GuestID { get; set; }31. 32. [Required]33. public string FirstName { get; set; }34. 35. [Required]36. public string LastName { get; set; }37. 38. public List<Reservation> Reservations { get; set; }39.}40. 41.public class Reservation42.{43. 44. public Reservation()45. {46. Charges = new List<RoomCharge>();47. }48. 49. public int ReservationID { get; set; }50. 51. [Required]52. public Room Room { get; set; }53. 54. [Required]55. public Guest Guest { get; set; }56. 57. [Required]58. public DateTime ArrivalDate { get; set; }59. 60. [Required]61. public DateTime DepartureDate { get; set; }62. 63. [Required]64. public DateTime BookingDateTime { get; set; }65. 66. public List<RoomCharge> Charges { get; set; }67. 68.}With these initial objects defined, we can then declare and code the DataContext for EntityFramework to be able to consume these data objects. This is the piece that creates the c-sharp – database glue, coupling our code to a database.
01.public class RoomSchedulerContext : DbContext02. {03. 04. public DbSet<Guest> Guests { get; set; }05. 06. public DbSet<Reservation> Reservations { get; set; }07. 08. public DbSet<Room> Rooms { get; set; }09. 10. }Adding Sample Data
Finally, I’ve defined a Database Initializer class that will configure some sample data. This initializer class will be used to destroy and rebuild the database each time we restart the application. This is important because reservations are time dependent, and this constant reseeding of test data will ensure we always have “current” data in the application. I’ve purposely omitted most of the code in this class for brevity. You can find the complete class in the attached source at the end of this article.
01.public class DropCreateRoomSchedulerWithSeedData : DropCreateDatabaseAlways<RoomSchedulerContext>02. {03. protected override void Seed(RoomSchedulerContext context)04. {05. CreateRooms(context);06. 07. CreateGuests(context);08. 09. context.SaveChanges();10. 11. CreateReservations(context);12. }13. 14. private void CreateGuests(RoomSchedulerContext context)15. {16. 17. context.Guests.Add(new Guest { GuestID = 1, FirstName = "Bill", LastName = "Lumbergh" });18. context.Guests.Add(new Guest { GuestID = 2, FirstName = "Tony", LastName = "Pepperoni" });19. context.Guests.Add(new Guest { GuestID = 3, FirstName = "Joseph", LastName = "Bag O'Donuts" });20. context.Guests.Add(new Guest { GuestID = 4, FirstName = "Dwight", LastName = "Shrute" });21. context.Guests.Add(new Guest { GuestID = 5, FirstName = "Theo", LastName = "Stig" });22. 23. }24. 25. }With the EntityFramework configuration completed, we just need to add an entry to global.asax to initialize the data source:
1.public class Global : System.Web.HttpApplication2. {3. 4. protected void Application_Start(object sender, EventArgs e)5. {6. Database.SetInitializer(new DropCreateRoomSchedulerWithSeedData());7. }8. }That’s it, every time we start the application a Sql Server Compact database will be created on disk in the App_Data and loaded with our test data. Any previous database that was created will be destroyed and replaced with this sample data.
Our First Data-Bound Control – The Occupancy Gauge
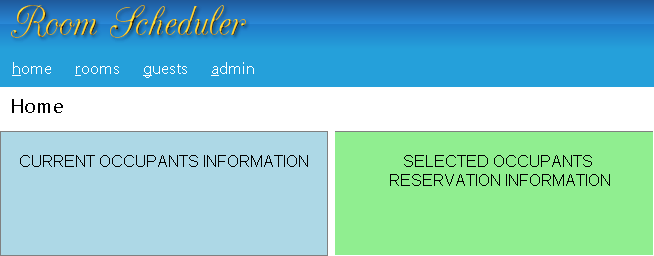
With our data configuration completed, I’m now going to start building out the home page dashboard. This dashboard will be a landing page that gives ‘at-a-glance’ information to a hotel clerk who is servicing guests. The intended layout of this screen will be as follows:
The width of the left panel will be 320 pixels, the same width as the ‘snap-panel’ on Windows 8. The right panel will stretch to fill the remaining screen space.
The first item we will add to the left panel will be an occupancy percentage gauge. This will provide the user with immediate knowledge of how many rooms are available and how “full” our hotel is for the day. I will start by adding a div to hold our gauge within the default.aspx page and adding some labels:
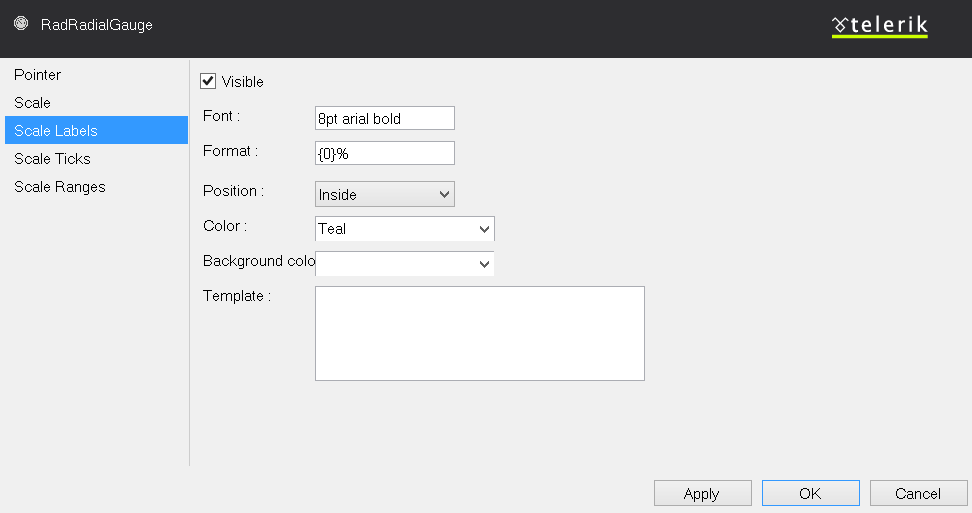
1.<div class="leftPanel">2. <div id="topLeft" style="text-align: center; color: teal; font-weight: bold;">3. <asp:label runat="server" ID="occupancyLabel" Text="Today's Occupancy Pct" />4. <!-- INSERT GAUGE HERE -->5. <h4 style="margin: 0px 0px 5px 0px;"><asp:Literal ID="occupancyPctLabel" runat="server"></asp:Literal></h4>6. </div>7. </div>Now let’s add that gauge. I’m going to drag a Telerik RadRadialGauge from the toolbox into my HTML source code where I’ve indicated above. I’ll use the control’s smart tag and in the menu that appears, I’ll click the control’s “Configuration Manager” and I can set some of the formatting properties for this gauge. I’m going to leave most of the defaults in place, but I want to change the labels to appear as percentages. This formatting can be applied in the ‘Scale Labels” window as demonstrated below:
I’ll also use the ‘Scale Ranges’ option to define some colored bands for the gauge. In my case, I’m going to make 0-60% green, 61-90% yellow, and the remainng 91-100% red.
Next, we need to connect some data to this gauge from our data model. To do that, I’m going to write a small method into my Page_Load event in the default.aspx.cs code-behind file to fetch the data and set the values for the pointer and labels on this gauge:
01.protected void Page_Load(object sender, EventArgs e)02. {03. 04. // Begin a data context - connection to the database05. this._ThisContext = new RoomSchedulerContext();06. 07. SetTodaysOccupancyPct();08. }09. 10. private void SetTodaysOccupancyPct()11. {12. var totalRooms = (decimal)_ThisContext.Rooms.Count();13. var beginDay = DateTime.Today;14. var endDay = DateTime.Today.AddDays(1).AddSeconds(-1);15. var roomsOccupied = _ThisContext.Reservations.Where(r => 16. r.ArrivalDate < endDay && r.DepartureDate >= beginDay)17. .Count();18. var todaysOccupancyPct = roomsOccupied / totalRooms;19. this.occupancyGuage.Pointer.Value = todaysOccupancyPct * 100;20. occupancyPctLabel.Text = string.Format("{0} occupied - {1} rooms available", todaysOccupancyPct.ToString("0.0%"), totalRooms-roomsOccupied);21. }I have pulled my data access and formatting code into a ‘SetTodaysOccupancyPct method. This allows for easier refactoring of my code later, should I need to. The first few items in this method identify the total number of rooms in our hotel and the date range for which we are looking for reservations. Please note the date test clause inside of the Reservations.Where extension method, this allows us to identify all reservations that overlap the date range we are searching. In the final lines of this snippet we set the value to the Pointer of the gauge and an appropriate block of text for the footer label.
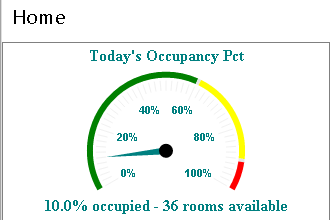
When we run this code, we should see a gauge that looks like the following:
Figure 4 - Our Completed RadRadialGauge
It’s now easy to see that we have rooms for guests to reserve. We have also verified that our data model is created properly and loaded with sample data, demonstrating that some reservations are already allocated.
That's it for today
In this article, we created a data model for out sample project and programmatically loaded it with test data. We then created our first data bound control to present some of the sample data we loaded into our database. We applied a format to that control, and bound the value of the pointer with a short snippet of c-sharp in the code-behind file. In our next step in this series, we’ll start to make this more interactive, allowing users to see who the current guests are and to review those guests’ reservations on the right side of our dashboard.
You can download the code for our sample project here. Please leave any questions or comments in the section below.

Jeffrey T. Fritz
Jeffrey T. Fritz is a Microsoft MVP in ASP.Net and an ASPInsider with more than a decade of experience writing and delivering large scale multi-tenant web applications. After building applications with ASP, ASP.NET and now ASP.NET MVC, he is crazy about building web sites for all sizes on any device. You can read more from Jeffrey on his personal blog or on Twitter at @csharpfritz.
Comments
All articles
Topics
Latest Stories
in Your Inbox
Subscribe to be the first to get our expert-written articles and tutorials for developers!
All fields are required