
A Modern Photobooth Web Application Built With ASP.Net AJAX
As a Developer Evangelist for Telerik’s ASP.Net controls, I get to see the really neat controls we’re building before they are delivered to you our customers. In January, I saw the upcoming release of the Image Editor control and got very excited about the possibilities of having a full image editor in the browser. You see, I have been working with HTML5 over the past year, and I knew there were capabilities to access a web cam from the browser. My mind put two and two together and thought it would be REALLY neat to build a photobooth application. In preparation for Telerik’s entry in the Best of Tech Ed competition, we decided to complete that demonstration website. This is the story of how we delivered a Photobooth web application to Telerik’s award winning Best of TechEd entry.
Goals
To deliver a successful application, we wanted to make the most of the new features available in the Q2 2013 release of the Telerik ASP.Net controls. These controls would be applied across the three screens that we identified for this application:
- An album page that lists the current photos in the album with names and assorted meta-data.
- A ‘camera’ page that allows the user to connect to the attached camera, take a photo and edit it in the browser.
- An all albums page that shows the list of all albums in the application. There should be some sort of preview of the content in the albums.
Additionally, with the significant availability of touch-enabled displays, it would be really great if we could ensure that this application was touch friendly. When we run the photo booth, I don’t want our users to need to use a keyboard and mouse. They should be able to touch the buttons on-screen to take pictures and adjust them as needed.
In the following three sections, I will show each page of the application and describe how we utilized the new features to accomplish these goals. There will even be a surprise or two in the camera page for you to check out.
Album Page
The album page would make use of our most popular control, Telerik’s ASP.Net GridView. In the Q2 2013 release, we introduced support for batch editing of entries in the grid. This made perfect sense for us to use as our album page, providing the ability to add and modify entries and saving a batch of changes in one large group. I was able to add this feature to a standard grid with an attribute setting and an entry in the MasterTableView settings of the grid called BatchEditingSettings:
<MasterTableView EditMode="Batch"> <BatchEditingSettings EditType="Row" OpenEditingEvent="MouseDown" /></MasterTableView>
Code Listing 1 – Batch Editing Settings
I have removed some extra settings from the source to focus on just those settings that we applied to make the batch editing capabilities work for this screen. The configuration I am using allows the entire row to be edited when there is a mouse click, or touch event. There are other options to control which cells are opened for edit, and which events (such as mouse over or double click) trigger the edit capabilities.
With a GridImageColumn defined in the grid and this batch editing, we were able to render an albums page that looked like the following:
Figure 1 – Album Grid with Batch Editing
Building a Camera Page
This was going to be our most interesting page to write. The API for using a camera from HTML5 is quite sketchy, and not fully implemented by all browsers. This is not currently a feature of our controls, so we built out this functionality by hand. We decided to focus the demo on the browser with the best support for using a webcam, Google Chrome, and use their APIs from JavaScript directly. I hope that in the future, we will see parity in this functionality provided from all browsers. At the time of the writing of this article, FireFox is starting to make an API for webcam access available. A full run-down of current webcam API availability in browsers is available from CanIUse.com
The camera was designed to take a picture and then make that image available with our Image Editor control so that users can apply filters, draw on the photo, and make other fun edits. The markup to house the viewfinder for the camera is the following HTML:
<div id="viewFinder"> <video id="screenshot-stream" class="videostream" autoplay></video> <img id="screenshot" src="" /> <canvas id="screenshot-canvas" style="display: none;"></canvas></div>
Code Listing 2 – Markup to Display the Video from a WebCam
The video tag is new in HTML5 and allows us to stream video content from the desktop. We use the getUserMedia command to connect the webcam to the video element in a block of JavaScript that looks like this:
if (navigator.getUserMedia) { navigator.getUserMedia('video', function (stream) { var video = $("#screenshot-stream"); video.show(); video.src = stream; localMediaStream = stream; }, onFailSoHard);}
Code Listing 3 – JavaScript to Display the WebCam Video
The interesting parts about this block of script are that we are showing the video element and then passing the video stream delivered to the anonymous callback function into the video element as its source. This shows the live video in the web page and then we take a local reference to the media stream for future use.
Now that the user see their smiling faces staring back at them from the webpage, we need to take a picture. We placed a button on the page that would trigger some script to copy the image from the HTML5 web cam stream into the canvas for the Telerik Image Editor control. You will notice in the code that we copied this image twice, once from the HTML5 stream into the canvas on screen, and then a second time into the image editor control. This is due to the data conversion that happens in the copy from the stream to the canvas, it provides the proper format for our Image Editor to present to the user.
var imgEditor = $find("<%= imageEditor.ClientID %>");var canvas = document.querySelector('.imageEditor canvas');var ctx = canvas.getContext('2d');imgEditor.resizeImage(video.videoWidth, video.videoHeight);var editImg = imgEditor.getImage();editImg.src = canvas.toDataURL('image/webp');
Code Listing 4 – Taking a Snapshot from the WebCam with JavaScript
At this point, the Image Editor takes over and we can use standard editing and saving capabilities provided by that control.
Tying It All Together, the TileList Main Menu Page
The final piece of this puzzle is the main menu screen. On this screen, we wanted to show off Telerik’s new TileList control. With this control, we would be able to create a Windows 8 start screen experience for our users. We did not want to stop at just making a menu, we wanted to make the tile list look like it belonged at the TechEd conference in New Orleans.
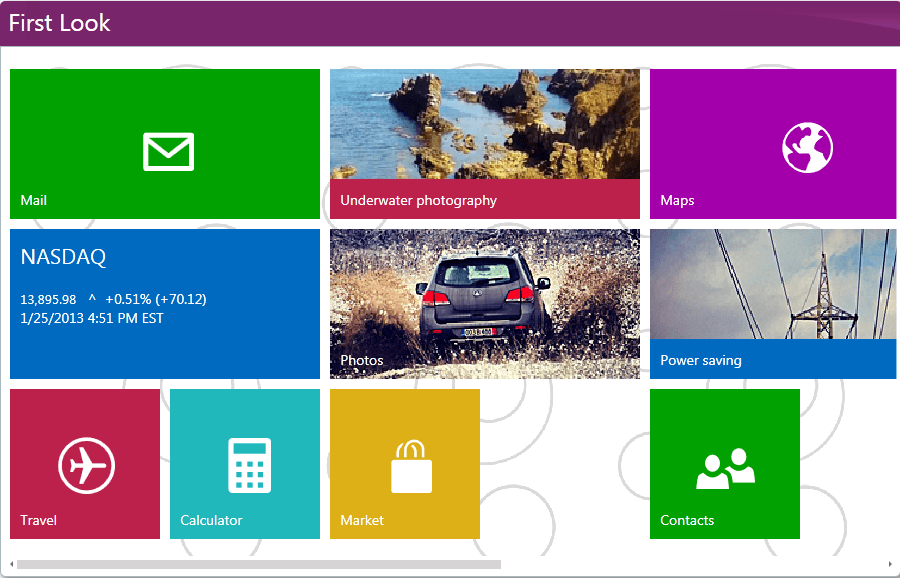
Our TileList was configured with a ‘Camera’ tile and a series of tiles that would represent other albums in the photobooth application. We chose clip art and themes for these tiles that would make them look like photos that were taken around New Orleans, and had that local feel.
Additionally, we added appropriate ‘peek templates’ and content that would highlight and tell a story about each album. Theoretically, this content could be derived from a description of the photo album the tile represents.
The TileList control provides simple markup for creating a great looking UI like this, and the one we wrote is a great example of that. We were able to use the RadImageTile for each of the albums to present a header image with this one line:
<telerik:RadImageTile Shape="Wide" ForeColor="#2A0F46" Title-Text="Mardi Gras!" ImageUrl="content/tiles/MardiGras!/Mardi_Gras.png" />
For some of the other tiles, we provided “peek” content that would slide in every few seconds. This markup is just as easy to define:
<telerik:RadImageAndTextTile Font-Bold="true" Title-Text="Tech Ed 2013" ImageUrl="content/tiles/TechEd2013/TechEd2013.png"> <PeekTemplate> <img src="content/tiles/TechEd2013/TechEd2013_Peek.png" /> </PeekTemplate> <PeekTemplateSettings ShowPeekTemplateOnMouseOver="true" HidePeekTemplateOnMouseOut="true" Animation="Slide" /></telerik:RadImageAndTextTile>
Code Listing 5 – Tile with PeekTemplate defined
The PeekTemplate contains any markup we would like to display in the tile, and in our case, we chose to show another image. The title-text content is displayed over both the image in the tile and the peek content. We then added settings to show the peek content when the mouse was over the tile. The animation is defined as a slide, which brings the new content in from the bottom of the tile. Other animation options include fade and resize.
Figure 2 – TechEd Tile and Peek Content
The last piece to write for this menu was a simple navigation when the user clicks on a tile. For the camera tile, this was easy, as we just added a NavigateUrl attribute to that tile that pointed to the camera page. For the albums, we wrote a function in the code-behind of the webform and connected it to the OnTileClick event for the RadTileList. This method looks like the following:
protected void albumList_TileClick(object sender, Web.UI.TileListEventArgs e){ if (string.IsNullOrEmpty(e.Tile.NavigateUrl)) { var albumName = e.Tile.Title.Text.Replace(" ", string.Empty); this.Page.Response.Redirect(string.Format("~/album.aspx?directory={0}", albumName)); } else { this.Page.Response.Redirect(e.Tile.NavigateUrl); }}
Code Listing 6 – Code to Control Tile Navigation
Summary
With very little markup and a little bit of cutting edge JavaScript, we were able to put together a simple but compelling Photobooth app that shows off some of the latest features in the Telerik ASP.Net control suite. To put the cherry on the top, we engaged our designers to customize our standard MetroTouch theme with a New Orleans purple color. The MetroTouch themes give all of our controls the ability to handle touch with larger buttons and scripts that interpret the touch gestures appropriately. We think that the results are outstanding for an application that can be built in just a few hours.
We will make the source code to this sample available in the coming weeks after we add a little more functionality to it, and challenge you to adapt it and add new capabilities. What could you do to make our photobooth even cooler? Write back to me in the comments area below with your thoughts.

Jeffrey T. Fritz
Jeffrey T. Fritz is a Microsoft MVP in ASP.Net and an ASPInsider with more than a decade of experience writing and delivering large scale multi-tenant web applications. After building applications with ASP, ASP.NET and now ASP.NET MVC, he is crazy about building web sites for all sizes on any device. You can read more from Jeffrey on his personal blog or on Twitter at @csharpfritz.
Related Posts
Comments
All articles
Topics
Latest Stories
in Your Inbox
Subscribe to be the first to get our expert-written articles and tutorials for developers!
All fields are required