A comparison of Angular and Vue when it comes to web development—highlighting their distinct approaches, use cases and functionalities.Angular and Vue are two leading technologies for crafting frontend web applications, each adopting unique approaches to development with their own set of philosophies.
Angular stands out as a comprehensive framework, offering a robust suite of features out of the box for building complex applications. In contrast, Vue is often celebrated for its simplicity and flexibility, functioning primarily as a progressive framework that can scale from an intuitive library to a full-fledged solution based on the project’s needs.
In today’s discussion, we’ll explore the nuances of Angular versus Vue, highlighting key differences, similarities and use cases for each. Specifically, we’ll look at these key areas:
- Fundamental principles
- Getting started
- Building the UI
- Routing
- Which one should we use?
Angular: A Comprehensive Framework
The official Angular documentation explains Angular as a web framework that provides a broad suite of tools, APIs and libraries to simplify and streamline development workflow. In other words, Angular is designed as a complete solution for building scalable web applications.
Angular achieves this through its comprehensive ecosystem, which includes:
- Component-based architecture: Angular’s building blocks are components that help encapsulate both logic and presentation. This modularity allows for reusable and maintainable code, making it easier to manage large applications.
- TypeScript-based development: Angular encourages the use of TypeScript, a superset of JavaScript, which provides static typing. This can help catch errors early in development, enforce coding standards and improve the overall quality of the code.
- Two-way data binding: Angular’s two-way data binding automatically synchronizes data between the model and view components. This simplifies the development process by reducing the need for additional code to handle these updates.
- Angular CLI: The Angular Command Line Interface (CLI) is a powerful tool that helps automate many development tasks. It simplifies project initialization, component generation, builds, testing and deployment.
- Advanced routing and navigation: Angular provides a robust routing module that supports complex navigation scenarios, lazy loading and nested routes, which are essential for building SPAs.
The above suite of features and tools makes Angular a very good choice for developers and teams looking to build scalable, maintainable and high-performing web applications.
Vue: The Progressive Framework
Vue.js, commonly referred to as Vue, positions itself as a progressive framework for building user interfaces. Unlike Angular’s all-encompassing approach, Vue is designed to be incrementally adoptable. Its core library focuses on the view layer only, making Vue an ideal choice for integrating into projects where you need more control over the granularity of the integration.
Vue’s simplicity does not come at the expense of its ability to power sophisticated applications when used in combination with modern tooling and supporting libraries.
Vue’s key features and philosophies include:
- Reactive and composable view layer: At its heart, Vue features a reactive and composable view layer. It leverages a reactive data system that automatically updates the DOM when the state of the application changes. Its component system allows developers to build complex applications from small, self-contained and reusable components, similar to building blocks.
- Single-file components: Vue’s single-file components (
.vue files) encapsulate the template, script and style of components in a single file. This approach makes components more cohesive and maintainable while leveraging modern tooling to preprocess assets like CSS. - Vue Router and Pinia: For applications needing more complex state management and routing, Vue offers official libraries like Vue Router and Pinia. These libraries integrate seamlessly with Vue’s core, providing a unified development experience.
- Options API vs. Composition API: Vue provides two powerful APIs for creating and organizing components: the Options API and the Composition API. The Options API uses an options object to define components, making it straightforward and accessible. The Composition API offers a more flexible way to organize and reuse logic across components.
In addition to the above, one of Vue’s most significant advantages is its gentle learning curve. With knowledge of HTML, CSS and JavaScript, developers can start building applications with Vue. The framework’s documentation is incredibly thorough and user-friendly, making it accessible to beginners and experienced developers alike.
Getting Started with Angular
To begin with Angular, we typically start by setting up the Angular environment, which involves installing Node.js and the Angular CLI. The Angular CLI can be installed with:
npm install -g @angular/cli
Once installed, we can create a new Angular project using the Angular CLI with a command like:
ng new new-app
The above command creates a new Angular project with the specified name of the app (e.g., new-app). This process sets up the basic structure for an Angular application, including various configuration files, a source folder with a basic app component, and dependencies listed in a package.json file. The Angular CLI also automatically configures a build process using webpack and sets up a development server for the application.
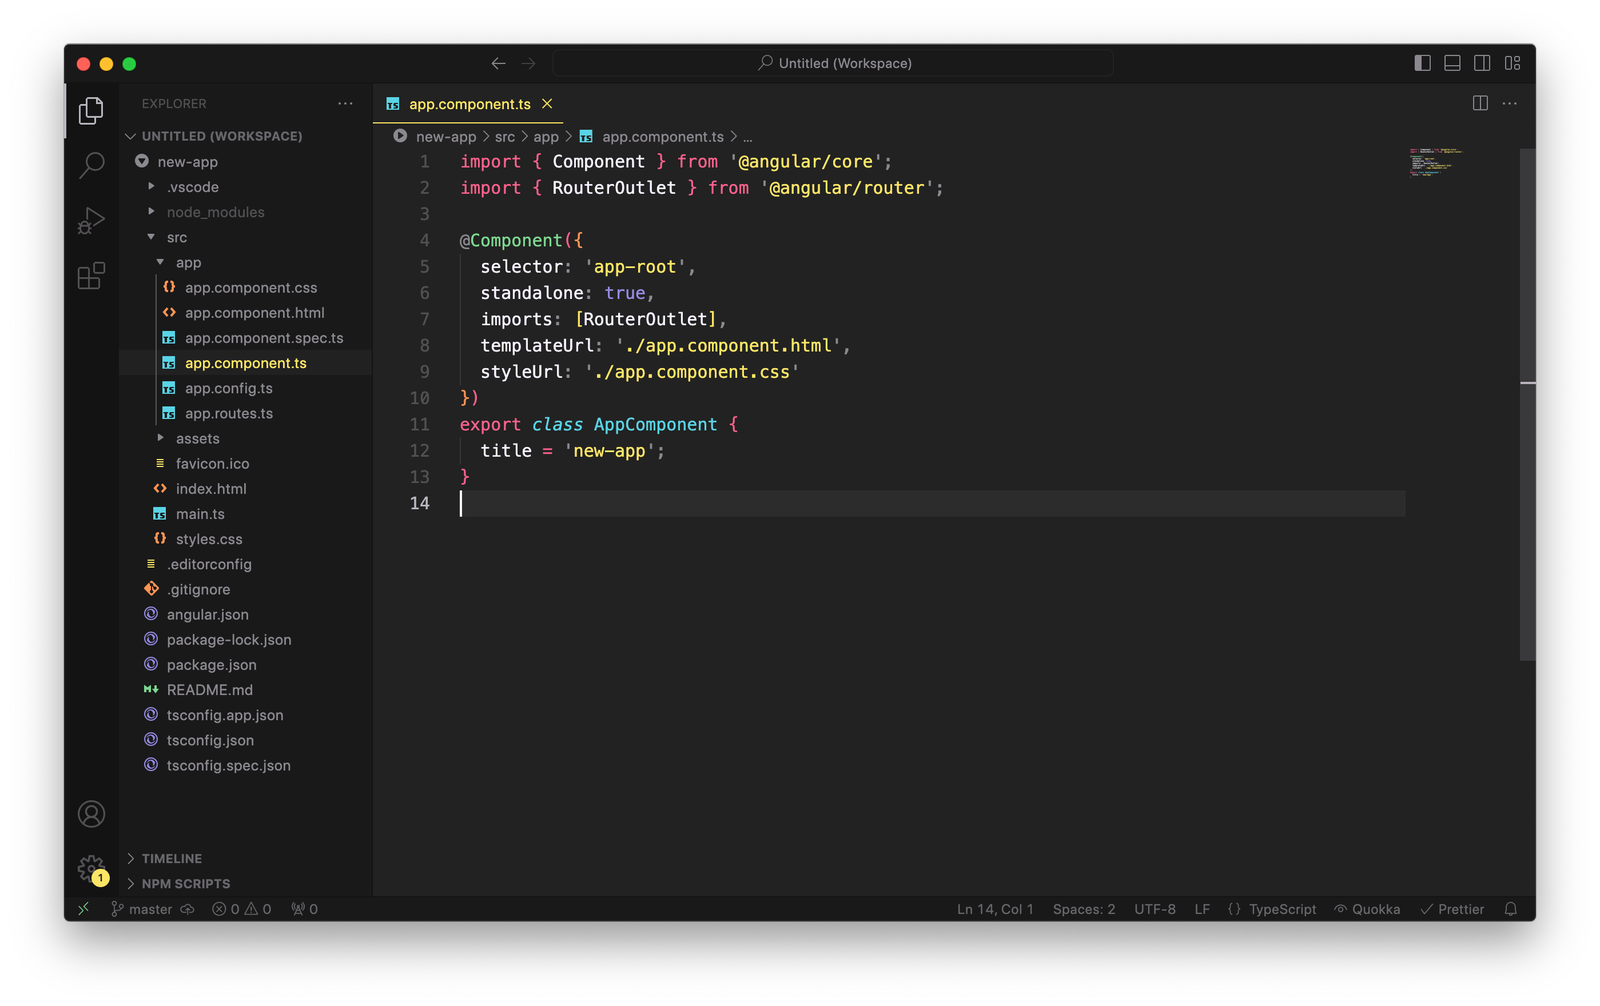
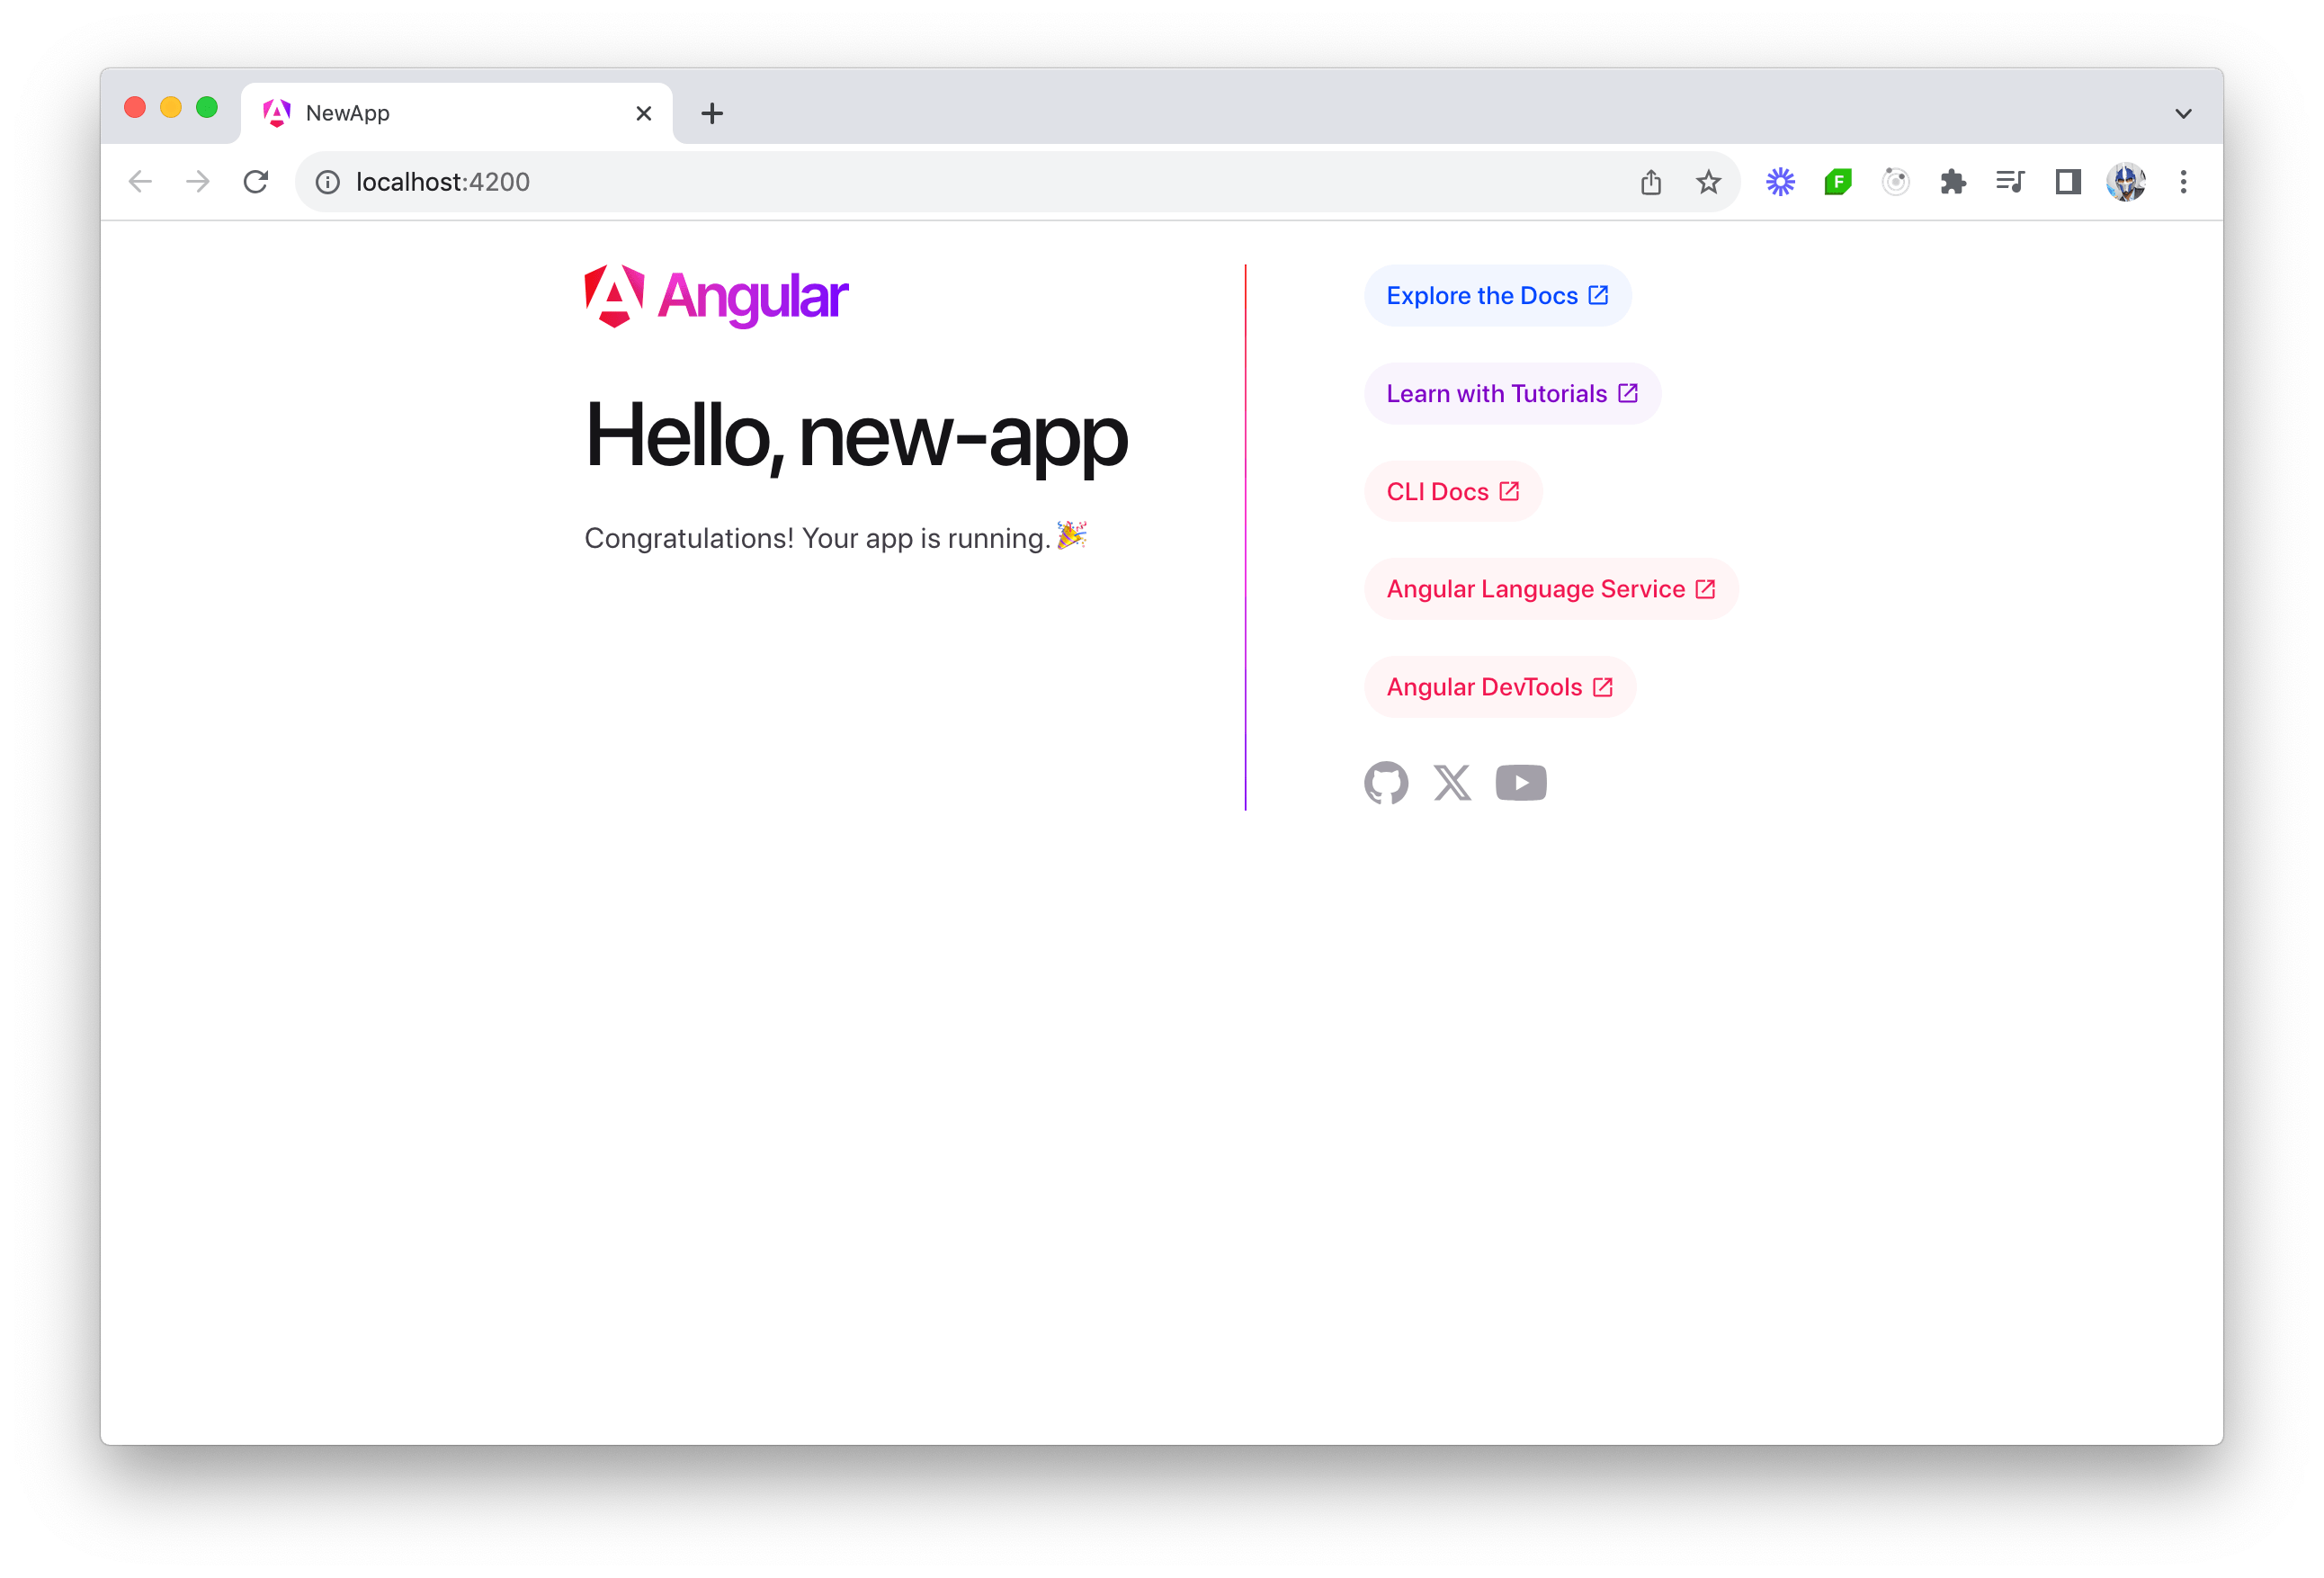
To run the newly created Angular application, we can run the following within the new project directory:
ng serve --open
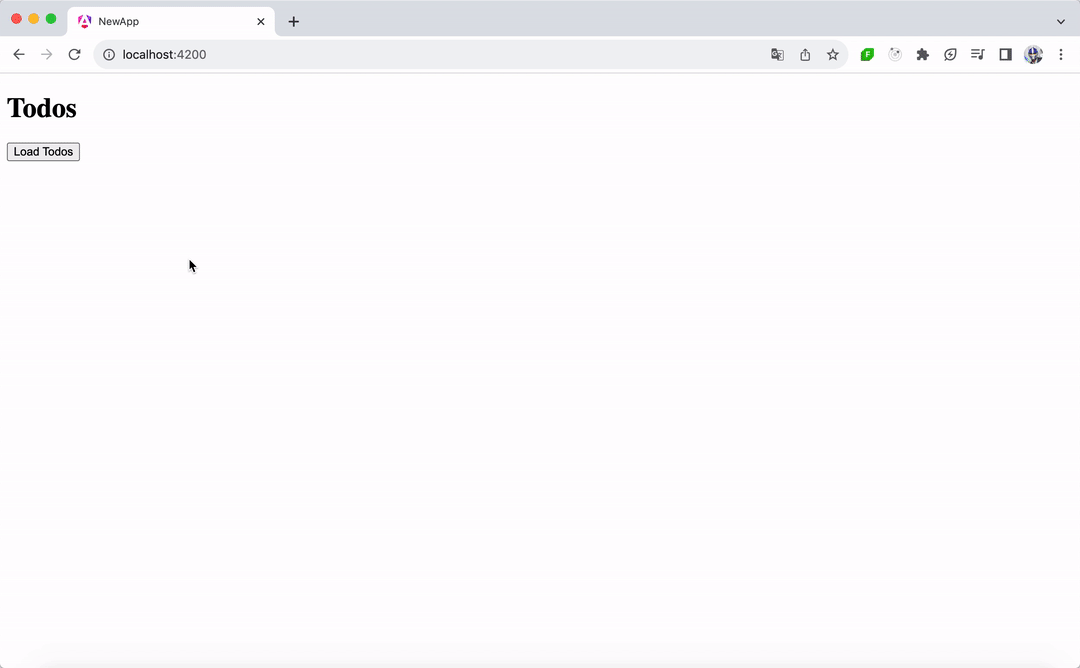
The above command compiles the application, starts a web server and opens the browser to http://localhost:4200 to view the generated application.
Getting Started with Vue
The Vue documentation recommends the use of Vite for a modern, fast and efficient development setup. Vite is a build tool that significantly improves the frontend development experience. It uses modern browser features to serve files to the browser during development, resulting in instant server start and lightning-fast hot module replacement (HMR).
Though we could use the Vite CLI to instantiate a new Vue project, we’ll instead use create-vue, the recommended official Vue project scaffolding tool, to start a Vite-powered Vue project.
With an up-to-date version of Node.js already installed, we can use the following command to create a Vue project.
npm create vue@latest
The above command installs and executes create-vue and presents us with a series of prompts to customize how we’ll want to structure our Vue app.
✔ Project name: … vue-app
✔ Add TypeScript? … No / Yes
✔ Add JSX Support? … No / Yes
✔ Add Vue Router for Single Page Application development? … No / Yes
✔ Add Pinia for state management? … No / Yes
✔ Add Vitest for Unit testing? … No / Yes
✔ Add an End-to-End Testing Solution? … No / Cypress / Playwright
✔ Add ESLint for code quality? … No / Yes
✔ Add Prettier for code formatting? … No / Yes

Scaffolding project in ./vue-app...
Done.
When installed, a new directory called vue-app is created with a pre-configured Vite/Vue project.
To run our Vue application, we can use the following command:
npm run dev
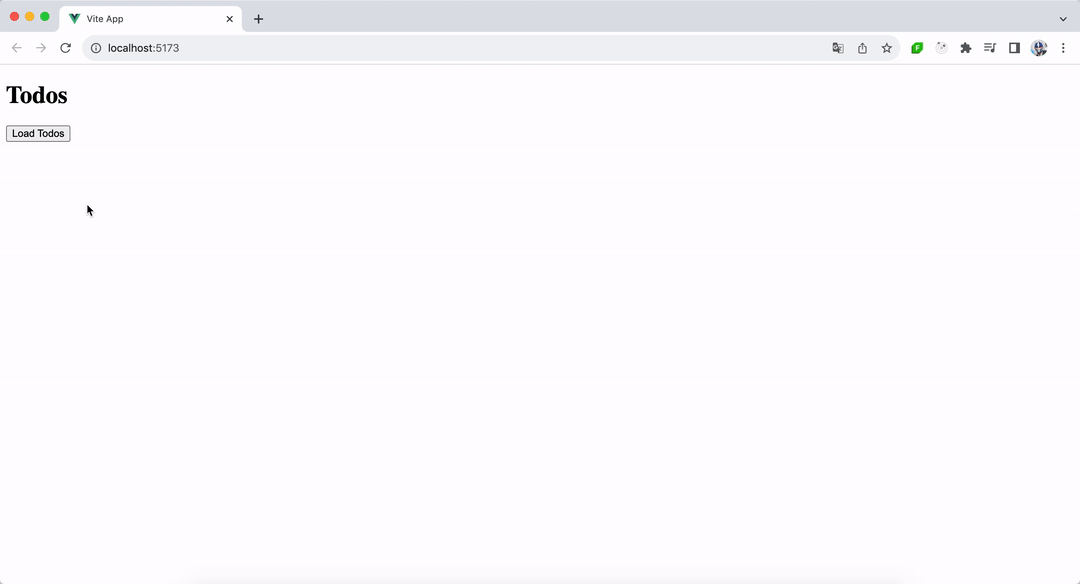
The above command launches the application on http://localhost:5173:

Building the UI
When it comes to coding and development, there’s a lot that can be covered, especially with frameworks and libraries as diverse as Angular and Vue.
To illustrate the core differences between them, let’s create a simple “Todos” application in both Angular and Vue. This application will display a “Todos” heading and include a button that, when clicked, fetches data from the public https://dummyjson.com/todos API to display a list of todos.

Building the UI with Angular
In Angular, building a “Todos” interface will involve creating components and services, using TypeScript and implementing data binding and state management. Let’s walk through this process step by step.
First, let’s understand the service part. In Angular, a service is a class with a specific purpose and responsibility—usually to fetch data or perform specific business logic. For our “Todos” app, we’ll create a TodoService that has a getTodos() function that uses Angular’s HttpClient to make a GET request to retrieve todos.
import { Injectable } from "@angular/core";
import { HttpClient } from "@angular/common/http";

@Injectable({
  providedIn: "root",
})
export class TodoService {
  constructor(private http: HttpClient) {}

  getTodos() {
    return this.http.get("https://dummyjson.com/todos");
  }
}
Above, we have the TodoService marked as @Injectable, which means it can be injected into components and other services.
Next, we’ll create a basic App class component in a main.ts file that will use the TodoService to load todos. The loadTodos() method in the component will call the service and subscribe to the observable returned by getTodos(), and when data is received, it updates a todos array.
import { Component } from "@angular/core";
import { CommonModule } from "@angular/common";
import { HttpClientModule } from "@angular/common/http";
import { TodoService } from "./todo.service";
import { bootstrapApplication } from "@angular/platform-browser";
export class App {
todos: Array<{ todo: string }> = [];
constructor(private todoService: TodoService) {}
loadTodos() {
this.todoService.getTodos().subscribe((data: any) => {
this.todos = data.todos;
});
}
}
bootstrapApplication(App);
Lastly, we’ll add the @Component decorator to mark the class as an Angular component. In the @Component decorator definition, we’ll specify the component template to include a button to load todos and a list to display them.
import { Component } from "@angular/core";
import { CommonModule } from "@angular/common";
import { HttpClientModule } from "@angular/common/http";
import { TodoService } from "./todo.service";
import { bootstrapApplication } from "@angular/platform-browser";

@Component({
  selector: "app-root",
  standalone: true,
  imports: [CommonModule, HttpClientModule],
  providers: [TodoService],
  template: `
    <h1>Todos</h1>
    <button (click)="loadTodos()" style="margin-bottom: 5px">Load Todos</button>
    <div *ngFor="let todo of todos">
      {{ todo.todo }}
    </div>
  `,
})
export class App {
  todos: Array<{ todo: string }> = [];

  constructor(private todoService: TodoService) {}

  loadTodos() {
    this.todoService.getTodos().subscribe((data: any) => {
      this.todos = data.todos;
    });
  }
}

bootstrapApplication(App);
The above demonstrates Angular’s component-based architecture now integrated into our webpage, where UI and behavior are encapsulated in components. Components are self-contained units of functionality that represent a portion of the user interface.
Each component is an independent block that includes both the logic and the views, meaning it contains its own HTML template, CSS styles and TypeScript code necessary to render a part of the page.
This modularity allows for easy reuse, testing and maintenance of each piece of the application, contributing to a more organized and efficient development process. Components also facilitate a clear separation of concerns, making Angular applications more scalable and easier to manage as they grow in complexity.
With the above code changes in place, our Angular application is now set up to display a “Todos” list. When the user clicks the “Load Todos” button, the application will call the TodoService to fetch todo items from https://dummyjson.com/todos. The fetched data is then displayed in a list format, with each todo item rendered through Angular’s *ngFor directive.
In summary, an Angular UI:
- Comprises one or more components
- Is typically written using TypeScript
- Leverages Angular’s core features like Dependency Injection and Services
- Utilizes Angular’s powerful data-binding and directives
Building the UI with Vue
Creating a “Todos” application in Vue involves a more straightforward and less boilerplate approach compared to Angular, thanks to Vue’s simplicity and flexibility.
Vue’s single-file components provide a cohesive development experience, where template, script and style are encapsulated in a single .vue file. Let’s walk through building the same “Todos” application in Vue.
First, we’ll create a TodoList.vue single-file component that encapsulates the entire logic and presentation of our Todos application.
<template>
<div>
<h1>Todos</h1>
<button @click="loadTodos">Load Todos</button>
<ul>
<li v-for="todo in todos" :key="todo.id">{{ todo.todo }}</li>
</ul>
</div>
</template>
<script setup>
import { ref } from "vue";
const todos = ref([]);
const loadTodos = async () => {
const response = await fetch("https://dummyjson.com/todos");
const data = await response.json();
todos.value = data.todos;
};
</script>
<style>
</style>
In the above component:
- The template section defines the HTML structure of our Todos application, including the button to load todos and the list to display them. Vue directives, such as v-for, are used to render a list of todos dynamically.
- The script section utilizes the Composition API for organizing the component’s reactive data (
todos) and logic (loadTodos() function). The ref() function is used to make the todos array reactive.
With the TodoList component created, we can import it and render it in our application’s entry point, which is the App.vue file.
<script setup>
  import TodoList from "./components/TodoList.vue";
</script>

<template>
  <TodoList />
</template>
With the above code changes in place, our Vue application is now set up to display a “Todos” list. When the user clicks the “Load Todos” button, the application fetches the todo items from the API and dynamically updates the UI to display them.
In summary, a Vue UI:
- Is centered around single-file components for cohesiveness
- Embraces reactive data binding
- Can utilize the Composition API for organizing logic and state management
Routing
To take our app a little further, we’ll implement routing to enhance the user experience. Routing is the ability to move between different parts of an application when a user enters a URL or clicks an element (like a link) within the application.
Our application will now have the added functionality of navigating to a detailed view of each todo item. When a user clicks on a todo from the list, the application will route to a new page displaying the title of that todo and its completed status.
Routing in Angular
Angular, being a full-fledged framework, includes a powerful and feature-rich routing library within its ecosystem. Angular’s Router enables developers to manage navigation from one view to the next as users perform application tasks.
To implement routing in the Angular version of our Todos application, we’ll leverage the Angular Routing library to define routes, capture parameters from the URL and navigate between components.
First, we’ll define the routes in the app.routes.ts file, where every route will map a URL path to a component. We’ll have one route for the list of todos (TodosComponent) and another for the todo detail view (TodoDetailComponent).
import { Routes } from "@angular/router";
import { TodosComponent } from "./todos.component";
import { TodoDetailComponent } from "./todo-detail.component";

export const routes: Routes = [
  { path: "", component: TodosComponent },
  { path: ":id", component: TodoDetailComponent },
];
After defining the routes, the next step is to import the RouterModule and register the routes with the root module of the application. With the latest Angular versions supporting standalone components, the routes are provided directly through the appConfig object in app.config.ts, leveraging provideRouter from @angular/router.
import { ApplicationConfig } from "@angular/core";
import { provideRouter } from "@angular/router";
import { routes } from "./app.routes";

export const appConfig: ApplicationConfig = {
  providers: [provideRouter(routes)],
};
To display the components based on the route, Angular uses the <router-outlet> directive. This acts as a placeholder that Angular dynamically fills based on the current route. We’ll have the App component template in main.ts include <router-outlet></router-outlet>, which is where the routed components will be rendered.
import { Component } from "@angular/core";
import { RouterModule } from "@angular/router";
import { bootstrapApplication } from "@angular/platform-browser";
import { appConfig } from "./app/app.config";

@Component({
  selector: "app-root",
  standalone: true,
  imports: [RouterModule],
  template: `<router-outlet></router-outlet>`,
})
export class App {}

bootstrapApplication(App, appConfig);
We’ll create the TodosComponent to be the page that lists the todos from the API when a button is clicked. This is the code we wrote earlier in the article. The main change we’ll now make is to have each todo item wrapped in an anchor tag (<a>), using the [routerLink] directive to generate a link to the todo detail view. This directive binds the link to the path specified, including the todo’s id.
import { Component, OnInit } from "@angular/core";
import { CommonModule } from "@angular/common";
import { HttpClientModule } from "@angular/common/http";
import { TodoService } from "../todo.service";
import { RouterModule } from "@angular/router";
@Component({
selector: "app-todos",
standalone: true,
imports: [CommonModule, HttpClientModule, RouterModule],
providers: [TodoService],
template: `
<h1>Todos</h1>
<button (click)="loadTodos()" style="margin-bottom: 5px">Load Todos</button>
<ul>
<li *ngFor="let todo of todos">
<a [routerLink]="['/', todo.id]">{{ todo.todo }}</a>
</li>
</ul>
`,
})
export class TodosComponent implements OnInit {
todos: Array<{ id: string; todo: string }> = [];
constructor(private todoService: TodoService) {}
ngOnInit(): void {}
loadTodos() {
this.todoService.getTodos().subscribe((data: any) => {
this.todos = data.todos;
});
}
}
Lastly, we’ll create the TodoDetailComponent, which will be responsible for showing the details of a todo when the relevant route of that todo is visited. In this component, we’ll access the current route’s parameters to fetch the todo’s details by using the ActivatedRoute service from @angular/router.
import { Component, OnInit } from "@angular/core";
import { CommonModule } from "@angular/common";
import { HttpClientModule } from "@angular/common/http";
import { ActivatedRoute } from "@angular/router";
import { TodoService } from "../todo.service";
@Component({
selector: "app-todo-detail",
template: `
<div *ngIf="todo">
<h2>{{ todo.todo }}</h2>
<p>Completed: {{ todo.completed ? "Yes" : "No" }}</p>
</div>
`,
standalone: true,
imports: [CommonModule, HttpClientModule],
providers: [TodoService],
})
export class TodoDetailComponent implements OnInit {
todo: { id: string; todo: string; completed: boolean } = {
id: "",
todo: "",
completed: false,
};
constructor(
private route: ActivatedRoute,
private todoService: TodoService
) {}
ngOnInit(): void {
const id = this.route.snapshot.params["id"];
this.todoService.getTodo(id).subscribe((todo: any) => (this.todo = todo));
}
}
The ngOnInit lifecycle hook in Angular is a critical function that gets called as soon as the component is initialized. For the TodoDetailComponent, ngOnInit is used to capture the route parameter (the id of the todo item) and fetch the corresponding todo details using the TodoService.
In TodoService, we’ll add the new getTodo method to fetch the details of a specific todo item by its id.
import { Injectable } from "@angular/core";
import { HttpClient } from "@angular/common/http";
@Injectable({
providedIn: "root",
})
export class TodoService {
getTodo(id: number) {
return this.http.get(`https://dummyjson.com/todos/${id}`);
}
}
Our app has now been updated so that when a user clicks on a todo item in the list, they are taken to a URL corresponding to that todo’s ID, for example, /1. The new TodoDetailComponent component will fetch and display the todo’s details.
Angular’s approach to routing is declarative and integrated into its ecosystem and offers more advanced capabilities such as lazy loading for improved performance, route guards for securing routes and path-matching strategies for complex routing scenarios.
Routing in Vue
Routing in Vue is often managed with Vue Router, Vue’s official routing library. Vue Router enables dynamic routing with components, allowing developers to map different paths to different Vue components.
To implement routing for the “Todos” application in Vue, we can first add Vue Router by running the following in our project directory.
npm install vue-router@4
In our app, we’ll create a router directory with an index.js file to define our routes. Here’s where we’ll have two routes: the home route (/) that loads the TodoList component and a dynamic route (/todo/:id) for individual todo details that will load a TodoDetail component we’ll create shortly.
import { createRouter, createWebHistory } from "vue-router";
import TodoList from "../components/TodoList.vue";
import TodoDetail from "../components/TodoDetail.vue";

const routes = [
  { path: "/", component: TodoList },
  { path: "/todo/:id", component: TodoDetail },
];

const router = createRouter({
  history: createWebHistory(),
  routes,
});

export default router;
To register the router and have our whole Vue app router-aware, we’ll modify the core main.js file and have our Vue app use the router instance.
import { createApp } from "vue";
import router from "./router";
import App from "./App.vue";
const app = createApp(App);
app.use(router);
app.mount("#app");
We’ll now create the TodoDetail.vue component that will hold the responsibility of displaying the details of a single todo.
<template>
  <div v-if="todo">
    <h2>{{ todo.todo }}</h2>
    <p>Completed: {{ todo.completed ? 'Yes' : 'No' }}</p>
  </div>
</template>

<script setup>
  import { ref, onMounted } from "vue";
  import { useRoute } from "vue-router";

  const route = useRoute();
  const todo = ref(null);

  onMounted(async () => {
    const response = await fetch(
      `https://dummyjson.com/todos/${route.params.id}`
    );
    const data = await response.json();
    todo.value = data;
  });
</script>
In the above component, we use the useRoute function from Vue Router to access the current route and its parameters. This allows us to fetch the details of a specific todo using its ID from the route parameters (route.params.id).
The onMounted lifecycle hook is utilized to perform the fetch operation as soon as the component is mounted to the DOM, ensuring that the todo details are retrieved and displayed to the user immediately upon navigation to the detail view.
In the TodoList component, we’ll make a change to ensure each todo title is a link that, when clicked, navigates the user to the detail view of that todo. Vue Router provides the router-link component for navigation:
<template>
<div>
<h1>Todos</h1>
<button @click="loadTodos">Load Todos</button>
<ul>
<li v-for="todo in todos" :key="todo.id">
<router-link :to="`/todo/${todo.id}`"> {{ todo.todo }} </router-link>
</li>
</ul>
</div>
</template>
<script setup>
</script>
<style>
</style>
Since we intend to render two separate page components based on the route the user is in, the last change we’ll make is to ensure our main App.vue component uses the router-view element from Vue Router. router-view acts as the placeholder where the matched component will be rendered.
<template>
  <router-view></router-view>
</template>
With all these changes in place, our Vue app now supports dynamic routing, allowing users to navigate between the list of todos and detailed views for each todo. When a user clicks on a todo item in the list, they are taken to a URL corresponding to that todo’s ID, for example, /todo/1. The TodoDetails component will fetch and display the todo’s details.
Routing in Vue applications is handled a bit differently compared to Angular, largely because Vue’s core library itself does not inherently include a routing system. Instead, routing functionality in Vue is achieved through the use of Vue Router.
This design choice underscores Vue’s philosophy of being a lightweight, flexible library focused solely on building user interfaces, allowing developers the freedom to integrate only the functionalities they need for their specific project.
Which One Should You Use?
So all this brings us to the important question: which one should you choose? This will largely depend on the requirements of your project and your development goals.
Angular is a powerful, full-fledged framework suitable for building complex, large-scale web applications. It offers a broad range of features and a structured development approach, making it ideal for enterprise-level applications or projects where a comprehensive solution is needed. We encourage you to use Angular if you need a comprehensive solution and prefer an all-in-one solution for routing, state management and building components.
Angular Pros
- Well-established framework.
- Everything you need is included.
- TypeScript support is baked in and offers reliable type safety.
- You can build Angular apps for web, native desktop and native mobile.
Angular Cons
- TypeScript brings its own learning curve.
- Angular itself carries a steep learning curve.
- Angular’s docs, while comprehensive, are jam-packed with Angular-specific terminology and concepts which can be hard to digest and fully understand on first read.
Vue, on the other hand, is known for its simplicity and flexibility, making it a great choice for both small projects and large-scale applications. It’s particularly favored for its gentle learning curve and the ability to integrate it gradually into existing projects. Vue’s ecosystem, including Vue Router for routing and Pinia for state management, allows developers to adopt these solutions as needed, without the all-or-nothing approach of Angular.
Vue Pros
- Well-established framework.
- Lighter touch library compared to other frameworks such as Angular. (The core Vue library handles the essentials with tangential features like routing available in separate libraries.)
- Can be incrementally added to enhance existing applications.
- You’re free to plug in any other JS libraries you might need for your app.
- A large existing JS library ecosystem to lean on.
- Extensive documentation available.
Vue Cons
- Vue is largely unopinionated about how your application should be structured (only a con if you prefer a more opinionated, prescriptive approach).
- While the create-vue utility abstracts some of the details away, if you do decide to build your entire app around Vue, you’ll be rubbing up against the JS ecosystem, which brings its own complexity (build tools, package managers, compilation for different browsers).
Ultimately, the choice between Angular and Vue strongly depends on your preference and the intended goals of your project. Both Angular and Vue have their unique strengths, and the best choice varies based on specific project requirements and developer expertise.
Read More Head-to-Head Comparisons
Whichever framework you want to use, you can make development much easier with a professionally designed UI component library. Progress Kendo UI and Telerik have you covered! Try any flavor free for 30 days:
]]>